
How to use DynamoDB with Apollo GraphQL and NodeJS Serverless
Serverless lambda is stateless. It means it does not share any data between two calls of the same function, so now we need to find out how to actually store the data.
When it comes to AWS, we have multiple choices:
- Aurora — a MySQL/PostgreSQL-compatible service,
- DocumentDB — a MongoDB-compatible service,
- DynamoDB — a special kind of NO-SQL database,
- ElastiCache — in-memory storage (based on Redis or Memcache),
- Any other data storage running on EC2.
Today we will talk about DynamoDB. Facts you should know about DynamoDB before you proceed:
- It does not support JOIN-s, it is a non-relational database.
- It is a schema-less database, like MongoDB and unlike MySQL.
- It supports storing of deeply-nested objects in DynamoDB table, like in MongoDB.
- It is required to create tables explicitly with DynamoDB, like in MySQL and unlike in MongoDB.
- It does not have a query optimizer. It means, that in order to optimize your quires you will have to tell DynamoDB which index you would like to use in every query, explicitly. This can be a crucial factor against DynamoDB if you are building, for example, a rich query constructor available for users.
- The same problem exists when it is required to sort items in the result.
- Also, the size of the result of searching cannot be more than 1mb. If there is more — the database truncates the list of items and inform about this fact in the result.
- It does not support storage of
Dateobjects, unlike in both MongoDB and MySQL (but you can always store a string representation of a date). - It does not support integrity checks.
- It scales automatically, you don’t need to worry about provisioning: you just need to choose one of the available scaling strategies.
- You are allowed to create only one database on your account per a region, so if you want to create, let’s say,
stageandproduction“databases”, you will have to come up with a prefix system of some sort when naming your tables.
Still sounds okay for your task? Then let’s go!
In the previous article, we have created a tiny lambda function and spun up Apollo GraphQL server inside. I am going to re-use the repository we have made. Feel free to clone it or come up with something of your own, it does not have to be Serverless: an Express application will also do.
To avoid additional money expenses while developing the application, it is a good practice to have a DynamoDB server installed locally. I strongly encourage you to use Docker for this.
So, open ./compose.yml and add there another service with a DynamoDB image:
version: '3'services:graphql.app:build:context: ./graphql.app/dockerfile: Dockerfileexpose:- 3000ports:- 3000:3000volumes:- ./graphql.app/:/appenvironment:- DB_URL=http://db:8000db:image: amazon/dynamodb-localentrypoint: javacommand: '-jar DynamoDBLocal.jar -sharedDb -dbPath /data'expose:- 8000ports:- 8000:8000volumes:- ./.db-files/:/datadb.gui:image: aaronshaf/dynamodb-adminexpose:- 8001ports:- 8001:8001environment:- DYNAMO_ENDPOINT=http://db:8000
It is also required to create a ./.db-files folder in order to make the volume work.
There are also other options, like a serverless plugin called serverless-dynamodb-local. It will require to install Java Runtime Environment though.
As an example, we will continue building our StarWars application based on swapi.co. We are going to weaponize our heroes because it is dangerous out there in a far-far galaxy where the star war happens.
DynamoDB uses tables in order to store data. So, let's create one at ./graphql.app/src/db/tables/weapon.js:
export default {TableName: 'weapon',KeySchema: [{AttributeName: 'id',KeyType: 'HASH',},],AttributeDefinitions: [{AttributeName: 'id',AttributeType: 'S',},],ProvisionedThroughput: {ReadCapacityUnits: 5,WriteCapacityUnits: 5,},};
DynamoDB is a schema-less database, but still, you need to define a shape of a so-called "partition key". Yes, DynamoDB uses partitioning to be fast and scalable. For each item, a key value should be unique and random with a good spread, in order to allocate keys between partitions as equally as possible. Most of the time, the partition key is also your primary key.
Read/write capacity units mean how many operations on a table you are going to have per second. On localhost, these values do not matter. In production, there are some advanced settings available to tune up the auto-scaling and provisioning, so these two values can adaptively vary according to the load level. The higher those values the more you pay.
Configuring your provisioning strategy in the right way is important because if the database load breaches the limit defined by the capacity units, the requests will start failing, they will not queue. Automatic upscaling may also take some time, so it is better to add a little bit more of resources.
To be cool, we also create an index file for our table(s) in ./graphql.app/src/db/tables/index.js 🤘:
import Weapon from './weapon';export default [Weapon];
Good news: we are not required to write API, it is already there: AWS SDK for JavaScript. Just install it:
npm install aws-sdk crypto-random-string
Let's create a simple wrapper in order to manage our connection to the database.
In the ./graphql.app/src/db/index.js:
import AWS from 'aws-sdk';import tables from './tables';export default class Database {async connect() {if (!this._connection) {let params = {};if (__DEV__) {params = {endpoint: process.env.DB_URL,region: 'local',accessKeyId: 'local',secretAccessKey: 'local',};} else {params = {region: 'eu-central-1',apiVersion: '2012-08-10',};}this._connection = new AWS.DynamoDB(params);if (__DEV__) {// will create tables through lambda only in developmentawait this.createTables(tables);}}return this._connection;}async putItem(params) {return new Promise((resolve, reject) => {this._connection.putItem(params, (err, data) => {if (err) {reject(err);} else {resolve(data);}});});}async getItem(params) {return new Promise((resolve, reject) => {this._connection.getItem(params, (err, data) => {if (err) {reject(err);} else {resolve(data);}});});}async updateItem(params) {return new Promise((resolve, reject) => {this._connection.updateItem(params, (err, data) => {if (err) {reject(err);} else {resolve(data);}});});}async scan(params = {}) {return new Promise((resolve, reject) => {this._connection.scan(params, (err, data) => {if (err) {reject(err);} else {resolve(data);}});});}async deleteItem(params) {return new Promise((resolve, reject) => {this._connection.deleteItem(params, (err, data) => {if (err) {reject(err);} else {resolve(data);}});});}async createTables(tables) {for (let k = 0; k < tables.length; k++) {const table = tables[k];await new Promise((resolve, reject) => {this._connection.createTable(table, (err) => {if (err) {if (err.code !== 'ResourceInUseException') {console.dir(err);reject(err);} else {console.dir(`Table "${table.TableName}" exists`);resolve();}} else {console.dir(`Created table "${table.TableName}"`);resolve();}});});}}}
Important: make sure that "region" for production is the same as in the serverless.yml file.
I have decided to wrap database methods with promises, in order to make the consumer code slightly better. I hope you don't mind.
The __DEV__ constant is defined using Webpack DefinePlugin in ./graphql.app/webpack.config.js like this:
...const webpack = require('webpack');module.exports = {...plugins: [new webpack.DefinePlugin({__DEV__: slsw.lib.webpack.isLocal,}),]};
In order to expose our database to the outer world, we will connect it to the GraphQL server.
So, let's create all necessary files.
For the entity itself in ./graphql.app/src/graphql/types/weapon.graphql:
enum WeaponType {LIGHTSABERBLASTER}type WeaponParameters {name: String!value: String!}input WeaponParametersInput {name: String!value: String!}type Weapon {id: String!name: String!type: WeaponType!damage: Intparameters: [WeaponParameters]characters: [Character]}input WeaponInput {id: Stringname: String!type: WeaponType!damage: Intparameters: [WeaponParametersInput]}type Mutation {putWeapon(data: WeaponInput!): ResultdeleteWeapon(id: String!): Result}
And also a tiny type for the result in ./graphql.app/src/graphql/types/util.graphql:
type Result {error: String}
Then we update the ./graphql.app/src/graphql/types/index.js file in order to plug the types in:
import { mergeTypes } from 'merge-graphql-schemas';import util from './util.graphql';import movie from './movie.graphql';import character from './character.graphql';import weapon from './weapon.graphql';export default mergeTypes([util, movie, character, weapon], { all: true });
We also patch our characters types file in order to create a mutation.
So, in ./graphql.app/src/graphql/types/character.graphql:
type Character {id: String!fullName: String!movies: [Movie]!weapon: [Weapon]}type Mutation {equipWeapon(characterId: String!, weaponId: String!): Result}
The same goes for the resolvers. We create a new resolver file for the weapon entity:
In ./graphql.app/src/graphql/resolvers/weapon.js
export default {Mutation: {putWeapon: async (source, args, { dataSources }, state) => {const { data } = args;let result = {};try {await dataSources.weaponSource.put(data);} catch (e) {console.error(e);result.error = 'Internal error';}return result;},deleteWeapon: async (source, args, { dataSources }, state) => {const { id } = args;let result = {};try {await dataSources.weaponSource.delete(id);} catch (e) {console.error(e);result.error = 'Internal error';}return result;},},};
And we patch the characters resolver.
In ./graphql.app/src/graphql/resolvers/character.js
export default {Character: {movies: async (source, args, { dataSources }, state) => {return dataSources.movieSource(source.movies);},weapon: async (source, args, { dataSources }, state) => {return await dataSources.weaponSource.getForCharacter(source.id);},},Mutation: {equipWeapon: async (source, args, { dataSources }, state) => {const { characterId, weaponId } = args;const { weaponSource } = dataSources;let result = {};try {result = weaponSource.giveToCharacter(weaponId, characterId);} catch (e) {console.error(e);result.error = 'Internal error';}return result;},},};
Don't forget to include all the resolvers in ./graphql.app/src/graphql/resolvers/index.js
import { mergeResolvers } from 'merge-graphql-schemas';import movieResolver from './movie';import characterResolver from './character';import weaponResolver from './weapon';const resolvers = [movieResolver, characterResolver, weaponResolver];export default mergeResolvers(resolvers);
Phewww… that was a lot. But the most annoying (I mean interesting) part is ahead: the data source.
We are going to create a data source file for our weapon entity: ./graphql.app/src/graphql/dataSources/weapon.js
import Database from '../../db';import stringGen from 'crypto-random-string';export default class WeaponSource {// our methods go here, we are going to discuss them belowasync getDatabase() {if (!this._db) {this._db = new Database();await this._db.connect();}return this._db;}}
Before discussing the methods, don't forget to initialize the data source in our handler ./graphql.app/src/index.js:
import { ApolloServer } from 'apollo-server-lambda';import resolvers from './graphql/resolvers';import typeDefs from './graphql/types';import characterSource from './graphql/dataSources/character';import movieSource from './graphql/dataSources/movie';import WeaponSource from './graphql/dataSources/weapon';// creating the serverconst server = new ApolloServer({// passing types and resolvers to the servertypeDefs,resolvers,// initial context state, will be available in resolverscontext: () => ({}),// an object that goes to the "context" argument// when executing resolversdataSources: () => {return {characterSource,movieSource,weaponSource: new WeaponSource(),};},});const handler = (event, context, callback) => {const handler = server.createHandler();// tell AWS lambda we do not want to wait for NodeJS event loop// to be empty in order to send the responsecontext.callbackWaitsForEmptyEventLoop = false;// process the requestreturn handler(event, context, callback);};export default handler;
We are going to use putItem(). The method is an "insert-replace" operation, and you need to specify the primary key value in advance.
async put(data) {const parameters = data.parameters || [];const allowedParams = ['color'];const item = {name: {S: data.name.toString(),},type: {S: data.type.toString(),},damage: {N: data.damage ? data.damage.toString() : '0',},parameters: {// always check what you save to the database, against a white listM: parameters.filter(x => allowedParams.indexOf(x.name) >= 0).reduce((result, item) => {result[item.name] = {S: item.value ? item.value.toString() : '',};return result;}, {})}};if (data.id) {item.id = {S: data.id.toString()};} else {// as we mentioned before, we need to specify a new key explicitlyitem.id = {S: stringGen(12)};}const db = await this.getDatabase();await db.putItem({TableName: 'weapon',Item: item,});}
As you may have already noticed, the syntax is quite complex. You should not only specify a value of an attribute, but also its type as a key of an extra object. This looks even weirder if you came here from MongoDB, where you need just pass a data object as it is and that is it.
I bet, the guys from Amazon felt like this too, so they made another class called DocumentClient. It makes things a little bit fancier because the class tries to map JavaScript data types into DynamoDB types automatically. Feel free to explore it on your own.
Meanwhile, the most useful types are:
- S - string
{S: "Hello"} - N - number
{N: "3.14"} - L - a list of values of a different type
{L: [{S: "I am a string"}, {N: "9.999"}]} - M - a sub-object
{M: {oneKey: {S: "Agent"}, anotherKey: {N: "0.07"}}} - BOOL - a boolean (so obvious)
{BOOL: true}
There are other specific types, see the documentation. Note, that :
- while put()-ting an item, you may specify any structure you like, and you don't need to describe a schema,
- the actual attribute values should be always converted to a string.
The delete operation is quite straight-forward, you just need to specify your partition key value:
async delete(id) {const db = await this.getDatabase();await db.deleteItem({TableName: 'weapon',Key: {id: {S: id.toString(),},},});}
This operation works pretty the same as the delete operation:
async get(id) {const db = await this.getDatabase();return db.getItem({TableName: 'weapon',Key: {id: {S: id.toString(),},},});}
When it comes to updating and searching, things look like kind of SQL :) We need to specify an update expression and fill up placeholders. I guess, by using the placeholders DynamoDB allows us to prevent injections automatically (well, at least I have tried to make an injection and failed:) ).
async giveToCharacter(id, characterId) {const result = {};const res = await this.get(id);if (res && res.Item) {const characters = res.Item.characters || {L: [],};characters.L.push({S: characterId,});const db = await this.getDatabase();await db.updateItem({TableName: 'weapon',Key: {id: {S: id.toString(),},},ExpressionAttributeNames: {'#CHARACTERS': 'characters',},ExpressionAttributeValues: {':c': characters,},UpdateExpression: 'SET #CHARACTERS = :c'});} else {result.error = 'Item not found';}return result;}
For searching there are two methods: scan() and query(). Let's try the first one. The same expression and placeholders work here.
async getForCharacter(id) {const db = await this.getDatabase();const result = await db.scan({TableName: 'weapon',ExpressionAttributeValues: {':cId': {S: id,},},FilterExpression: 'contains(characters, :cId)',});if (result && result.Items) {// need to "decode" the items, i know this is annoyingreturn result.Items.map((item) => {const p = item.parameters ? item.parameters.M : {};const parameters = [];Object.keys(p).forEach((k) => {parameters.push({name: k,value: p[k].S,});});return {name: item.name.S,damage: item.damage.N,id: item.id.S,type: item.type.S,parameters,};});}return [];}
Whoooa, that was aaaaaalot of code. Now it is time to have some fun.
Let's start the application:
docker-compose -f compose.yml up
and go to http://localhost:3000/graphql.
Create a red lightsaber.
mutation {putWeapon(data: {name: "The sword of DOOM"type: LIGHTSABERdamage: 1000parameters: [{ name: "color", value: "red" }]}) {error}}
In the database manager http://localhost:8001/tables/weapon we can see it now:

Now give the sword to Darth Vader.
mutation {equipWeapon(weaponId: "9085719d934c", characterId: "1") {error}}

Now if we call for the entire structure, we can write the query like this:
query {movie(id: "1") {titlecharacters {fullNameweapon {nametypedamageparameters {namevalue}}}}}
Darth Vader now has a weapon.

But, naaaah, it is too dangerous to keep this weapon in wrong hands, it is better to have the sword destroyed once and for all:
mutation {deleteWeapon(id: "9085719d934c") {error}}
The deployment is done as usual with serverless.
Authenticate like this:
npx serverless config credentials --provider aws --key #ACCESS_KEY_ID# --secret #SECRET_ACCESS_KEY#
Then deploy like this:
npx serverless deploy
But with DynamoDB on-board, we need to make two additional things.
Yes, again, but now in production. A table creation operation is quite heavy by itself, and keep in mind that we pay money for each millisecond while we execute the code inside our lambdas. Therefore, it is better to have our lambdas as fast as possible and create tables in advance.
We have several options here to create our table:
- in the AWS console opened in the browser,
- with an AWS command line tool,
- with a Cloud Formation script, like this one.
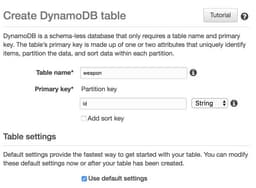
For now, let's choose the first option: go to the DynamoDB in the AWS console (don’t forget to choose a proper region!) and create a new table.
By default, any service does not have access to the other services, the policy is initially set to “deny”. We need to allow our lambda to talk to the database.
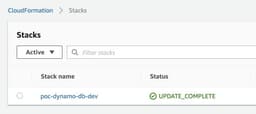
Go to CloudFormation → Stacks
Click on the stack name, go to the “Resources” tab and find our lambda permission role.
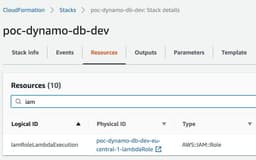
Click on the “Physical ID”.
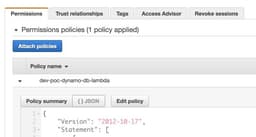
Now, for the real-real production, we should have pressed “Edit policy” and add as granular security permission as possible, by narrowing it to “allow several operations on weapons table from a certain account in a certain region”. But this goes really beyond the scope of the article, so we are going just click on “Attach policies” and add a pre-existed AmazonDynamoDBFullAccess policy.

So, click on the checkbox and then on “Attach policy” button.
Wow, that was a long article. Now we have learned how to run Apollo GraphQL server inside a lambda and use DynamoDB as a data storage.
- Check if your code is valid, so there is no “pending” abandoned promise somewhere around. Otherwise, it is probably not a problem of your lambda.
- Make sure that your DynamoDB region is right (so you have not put
eu-northinstead ofeu-north-1by mistake). - If nothing helped, try to increase your Read/Write capacity a little bit, or even switch to the “on-demand” strategy (don’t forget about your billing!).
- go to AWS console, enter CloudFormation and delete the deployment,
- OR rename your service in
serverless.yml.
Make sure that your DynamoDB table is created in the right region (we have used eu-central-1 above) and it is not in the “Creating” state.
Thanks for reading! I hope this article was helpful for you :)
- here is the proof-of-concept repository made for the article,
- read the official documentation on how to make indexes,
- consider reading the official best practices with DynamoDB,
- a new “on demand” mode of provisioning,
- full documentation on aws-sdk,
- always mind the prices.
Happy DynamoDB usage experience!
← Previous article: How to use Apollo GraphQL server with Serverless offline and in production
