
TM1637 LED driver meets Arduino: detailed explanation
For a software engineer once in a while it's good to make something that you can actually hold in your hands. Some people make ceramics, while the others sew or make paper models. I am indulging my interest in electronics, something I have tried to get into many years ago and failed due to procrastination and lack of materials.
So this time I got myself Arduino Nano IoT and a LED indicator, and blew away a thick layer of dust from my knowledge of C. How hard can this be?
This is basically a "hello world" of digital electronics: to make a LED indicator glow using Arduino.
The hardware used for the project:
- Arduino Nano 33 IoT
- A TM1637 based LED 4 Digit 7 Segment
- Solder-less Breadboard like this one + some wires (I already had the board and the wires left from my previous unfinished project)
- USB Type A female
- USB Type B female
- A couple of USB wires
As I am not an expert, I originally thought that the LED indicator had a simple shift register attached, and only that could have already saved a lot of effort. But actually, TM1637 was a LED driver: it was a whole device in itself, it allowed controlling the LED board and required a connection to be established with.
The device had 4 connectors: VCC, GND, CLK and DAT. Since I had zero knowledge on the subject, I have started digging the TM1637 datasheet. Honestly speaking, it was quite hard to understand.
The datasheet said the driver used the I2C interface: the CLK and DAT wires can have high and low states, and this was how the device was handled.
Then I have started my research on the I2C protocol. Originally I thought that, like in a shift register, I needed to set the CLK and DAT pins to output and started moving it from HIGH to LOW and back in a certain sequence. But actually, that wasn't so. In fact, the I2C protocol used a different interface called the «Open-drain communication».
The best material explaining the thing I've found so far was «Understanding the I2C bus» by Texas Instruments.
In this protocol, the High and Low states are defined in the following way:
- Open-Drain Pulling Low, with a short go GND. According to this doc, this mode can be achieved by setting the
pinMode()to OUTPUT anddigitalWrite()to LOW. - Open-Drain Releasing Bus and pulling the line High using the pull-up resistors. Again, from the doc, this mode is enabled by setting the
pinMode()to INPUT anddigitalWrite()again to LOW.
But I still kinda struggled to figure heads and tails. And then I've noticed a message engraved at the bottom of the driver plate, reading as "Use the Arduino TM1637.h library, and don't f*ck your brain you idiot".
However, as I am a junior C/C++ engineer, I was not looking for shortcuts there. So I got curious and looked into the source code of the mentioned library. Since the license allowed, I've decided to make my own version of the thing.
You may also want to ask "Why not just use Wire.h - the native Arduino library, like it's shown here?" Well, according to the datasheet, TM1637 does not actually implement I2C fully: the address block is missing. It was not required to be implemented, since there is always only one device on the bus. So it wouldn't gonna work out.
While looking into the library source, I've found out that the library only implements the second command sequence from the datasheet: "Write SRAM data in address auto increment mode":
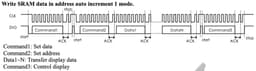
- The
Command1is the byte0b01000000called "Display and control command setting", it apparently tells the device that bothdataanddisplay settingswill follow. - The
Command2is0b11000000, and it can optionally contain thestart address. In my case I always rewrite all LEDs at once, so the address is always 0. - Then there should be 4 bytes of
Data, containing the desired value to display. - The final
Command3is used to define the settings of the display. There are only two settings actually:brightnessanddisplay on/off. In my case the display is always on, and since thebrightnessis a user input, it should be properly masked. So the final byte value would be0b10000000 + (0b00001000 & (0b00001111 | brightness))
The display has 4 digits with a dot attached. Each digit has 7 glowing segments. So it makes us 8 bits per a digit, including the dot.
The segments can be then assigned letters, like this:
Then every segment can be coded with one byte, where only one bit is on. For example 0b01000000 codes the segment G. Then runes can be defined as logical OR between the segments.
For example, the "1" digit can be coded as logical OR between segments B and C.
Keeping all that in mind, I have the following display.h file defined. At the bottom I also outlined the class structure.
#pragma once#include <cstdint>#include <vector>#include <Arduino.h>// commands#define DISP_I2C_COMM1 0b01000000 // data command setting#define DISP_I2C_COMM2 0b11000000 // address command setting (can be without address offset, then the address is 0)#define DISP_I2C_COMM3 0b10000000 // display control// brightness#define DISP_BR_0 0b00000000#define DISP_BR_1 0b00000001#define DISP_BR_2 0b00000010#define DISP_BR_3 0b00000011#define DISP_BR_4 0b00000100#define DISP_BR_5 0b00000101#define DISP_BR_6 0b00000110#define DISP_BR_7 0b00000111#define DISP_ON_MASK 0b00001000#define DISP_OFF_MASK 0b00000000#define DISP_CTRL_MASK 0b00001111// segments#define DISP_SEG_DP 0b10000000 // decimal point#define DISP_SEG_G 0b01000000#define DISP_SEG_F 0b00100000#define DISP_SEG_E 0b00010000#define DISP_SEG_D 0b00001000#define DISP_SEG_C 0b00000100#define DISP_SEG_B 0b00000010#define DISP_SEG_A 0b00000001// digits#define DISP_RUNE_NONE 0#define DISP_RUNE_DIG_0 DISP_SEG_A | DISP_SEG_B | DISP_SEG_C | DISP_SEG_D | DISP_SEG_E | DISP_SEG_F#define DISP_RUNE_DIG_1 DISP_SEG_B | DISP_SEG_C#define DISP_RUNE_DIG_2 DISP_SEG_A | DISP_SEG_B | DISP_SEG_G | DISP_SEG_E | DISP_SEG_D#define DISP_RUNE_DIG_3 DISP_SEG_A | DISP_SEG_B | DISP_SEG_G | DISP_SEG_C | DISP_SEG_D#define DISP_RUNE_DIG_4 DISP_SEG_B | DISP_SEG_C | DISP_SEG_G | DISP_SEG_F#define DISP_RUNE_DIG_5 DISP_SEG_A | DISP_SEG_F | DISP_SEG_G | DISP_SEG_C | DISP_SEG_D#define DISP_RUNE_DIG_6 DISP_SEG_A | DISP_SEG_F | DISP_SEG_G | DISP_SEG_C | DISP_SEG_D | DISP_SEG_E#define DISP_RUNE_DIG_7 DISP_SEG_A | DISP_SEG_B | DISP_SEG_C#define DISP_RUNE_DIG_8 DISP_SEG_A | DISP_SEG_B | DISP_SEG_C | DISP_SEG_D | DISP_SEG_E | DISP_SEG_F | DISP_SEG_G#define DISP_RUNE_DIG_9 DISP_SEG_A | DISP_SEG_B | DISP_SEG_C | DISP_SEG_D | DISP_SEG_F | DISP_SEG_G// minus#define DISP_RUNE_MINUS DISP_SEG_G// circle#define DISP_RUNE_UP DISP_SEG_F | DISP_SEG_A | DISP_SEG_B#define DISP_RUNE_TR DISP_SEG_A | DISP_SEG_B | DISP_SEG_C#define DISP_RUNE_BR DISP_SEG_B | DISP_SEG_C | DISP_SEG_D#define DISP_RUNE_DN DISP_SEG_C | DISP_SEG_D | DISP_SEG_E#define DISP_RUNE_BL DISP_SEG_D | DISP_SEG_E | DISP_SEG_F#define DISP_RUNE_TL DISP_SEG_E | DISP_SEG_F | DISP_SEG_A#define DISP_ANIMATION_DELAY 70class Display {public:Display(uint8_t pinCLKParam, uint8_t pinDIOParam);void setBrightness(uint8_t brightnessValue);void displayRunes(const uint8_t runes[]);void displayNumber(const int16_t number);void displayAnimation(std::vector<uint8_t> &frames);void clearAnimation();void tickAnimation();private:uint8_t pinCLK;uint8_t pinDIO;uint8_t brightness = DISP_BR_7;std::vector<uint8_t> currentAnimation;uint8_t currentAnimationFrame;unsigned long currentTime = millis();unsigned long previousTime = 0;void setRunes(const uint8_t runes[]);uint8_t encodeDigit(uint8_t digit);void delay();void start();void stop();void sendByte(uint8_t byte);};
And then we have the implementation. I've' provided comments in the code.
Two things worth mentioning here:
- After switching a pin from High to Low or back we need to wait for 100 microseconds. If we don't wait, the desired wave pattern won't form and the communication will not work.
- Many libraries have the animation player blocking the
loop()of Arduino. I've decided to do things differently. Instead, there is thetickAnimation()function that must be called. It will only show the next frame after a delay. The default frame rate is 70 milliseconds.
#include "display.h"#include <Arduino.h>#include <cstdint>Display::Display(uint8_t pinCLKParam, uint8_t pinDIOParam) {pinCLK = pinCLKParam;pinDIO = pinDIOParam;// Set the pin direction and default value.// Both pins are set as inputs, allowing the pull-up resistors to pull them uppinMode(pinCLK, INPUT);pinMode(pinDIO, INPUT);digitalWrite(pinCLK, LOW);digitalWrite(pinDIO, LOW);}void Display::setBrightness(uint8_t brightnessValue) {brightness = brightnessValue & DISP_CTRL_MASK;}void Display::setRunes(const uint8_t runes[]) {// according to the TM1637 protocol we send the first commandstart();sendByte(DISP_I2C_COMM1);stop();// then the second command + datastart();sendByte(DISP_I2C_COMM2);for (uint8_t k = 0; k < 4; k++) {sendByte(runes[k]);}stop();// and the final, third commandstart();sendByte(DISP_I2C_COMM3 + (DISP_ON_MASK | brightness));stop();}// displayRunes allows showing random runesvoid Display::displayRunes(const uint8_t runes[]) {clearAnimation();setRunes(runes);}// displayNumber allows showing a numbervoid Display::displayNumber(const int16_t number) {clearAnimation();// we cannot show numbers smaller than -999 and greater than 9999, because we only have a 4-digit displayint16_t safeNumber = number;if (safeNumber < -999) {safeNumber = -999;} else if (safeNumber > 9999) {safeNumber = 9999;}uint8_t runes[4] = {DISP_RUNE_NONE, DISP_RUNE_NONE, DISP_RUNE_NONE, DISP_RUNE_NONE};// detecting the signbool isNegative = safeNumber < 0;if (isNegative) {safeNumber *= -1;}// splitting onto digits and encode every digituint8_t i = 0;for (; i < 4; i++) {if (i != 0) {safeNumber = safeNumber / 10;}if (safeNumber < 1) {break;}uint8_t digit = safeNumber % 10;runes[3 - i] = encodeDigit(digit);}if (isNegative) {runes[3 - i] = DISP_RUNE_MINUS;}displayRunes(runes);}// encodeDigit converts digits into runesuint8_t Display::encodeDigit(uint8_t digit) {switch(digit) {case 0:return DISP_RUNE_DIG_0;break;case 1:return DISP_RUNE_DIG_1;break;case 2:return DISP_RUNE_DIG_2;break;case 3:return DISP_RUNE_DIG_3;break;case 4:return DISP_RUNE_DIG_4;break;case 5:return DISP_RUNE_DIG_5;break;case 6:return DISP_RUNE_DIG_6;break;case 7:return DISP_RUNE_DIG_7;break;case 8:return DISP_RUNE_DIG_8;break;case 9:return DISP_RUNE_DIG_9;break;default:return DISP_RUNE_NONE;}}// sendByte send a byte and receive the ACKvoid Display::sendByte(uint8_t byte) {uint8_t data = byte;// 8 Data Bitsfor(uint8_t i = 0; i < 8; i++) {// CLK lowpinMode(pinCLK, OUTPUT);delay();// Set data bitpinMode(pinDIO, data & 0x01 ? INPUT : OUTPUT);delay();// CLK highpinMode(pinCLK, INPUT);delay();data = data >> 1;}// Wait for acknowledge// CLK to zeropinMode(pinCLK, OUTPUT);pinMode(pinDIO, INPUT);delay();// CLK to highpinMode(pinCLK, INPUT);delay();uint8_t ack = digitalRead(pinDIO);if (ack == 0) {pinMode(pinDIO, OUTPUT);}delay();pinMode(pinCLK, OUTPUT);delay();}void Display::displayAnimation(std::vector<uint8_t> &frames) {currentAnimationFrame = 0;currentAnimation = frames;}void Display::clearAnimation() {std::vector<uint8_t> frames = {};currentAnimationFrame = 0;currentAnimation = frames;}// tickAnimation plays the next frame of the animation, if the time has comevoid Display::tickAnimation() {auto animationSize = currentAnimation.size();if (animationSize == 0) {return;}currentTime = millis();if (currentTime - previousTime > DISP_ANIMATION_DELAY) {auto i = currentAnimationFrame;auto rune1 = currentAnimation[i];i += 1;auto rune2 = DISP_RUNE_NONE;if (i <= animationSize - 1) {rune2 = currentAnimation[i];}i += 1;auto rune3 = DISP_RUNE_NONE;if (i <= animationSize - 1) {rune3 = currentAnimation[i];}i += 1;auto rune4 = DISP_RUNE_NONE;if (i <= animationSize - 1) {rune4 = currentAnimation[i];}if (i >= animationSize - 1) {currentAnimationFrame = 0;} else {currentAnimationFrame = i + 1;}uint8_t runes[] = { rune1, rune2, rune3, rune4 };setRunes(runes);previousTime = currentTime;}}void Display::delay() {delayMicroseconds(100);}void Display::start() {pinMode(pinDIO, OUTPUT);delay();}void Display::stop() {pinMode(pinDIO, OUTPUT);delay();pinMode(pinCLK, INPUT);delay();pinMode(pinDIO, INPUT);delay();}
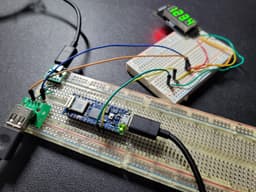
At first, I was trying to power up the driver using Arduino's VCC and GND pins. It perfectly worked with Arduino Uno, but with Nano the driver was going crazy. Apparently, the current provided by Nano simply wasn't enough. I've conducted small research on the problem, and it turns out that it is recommended to power every integrated circuit separately, allowing them only exchanging the signals.
Moreover, these integrated circuits should have common ground. Here is the explanation. I have tried to power Arduino with USB and the driver with an adapter, it did not work for me.
So my circuit looked like this. I may want to add a decoupling capacitor later when doing final assembly of the device, because it is recommended.
The circuit sketch was made using circuit-diagram.org, kudos!
Let's show off the rolling animation!
#include "display.h"#include <vector>Display disp(7, 8);void setup() {std::vector<uint8_t> frames = {DISP_RUNE_UP, DISP_RUNE_UP, DISP_RUNE_UP, DISP_RUNE_UP, // each row is one frameDISP_RUNE_TR, DISP_RUNE_TR, DISP_RUNE_TR, DISP_RUNE_TR,DISP_RUNE_BR, DISP_RUNE_BR, DISP_RUNE_BR, DISP_RUNE_BR,DISP_RUNE_DN, DISP_RUNE_DN, DISP_RUNE_DN, DISP_RUNE_DN,DISP_RUNE_BL, DISP_RUNE_BL, DISP_RUNE_BL, DISP_RUNE_BL,DISP_RUNE_TL, DISP_RUNE_TL, DISP_RUNE_TL, DISP_RUNE_TL,};disp.displayAnimation(frames);}void loop() {disp.tickAnimation();}
And this is what the rolling animation looks like:
Isn't that neat?
The GIF was made with a cool video -> gif ezgif.com converter, kudos!
That's it for today, folks. Hope this article inspired you to try Arduino. Personally, I had a lot of fun, and there is more to come.
