
How to set RaspberryPi up for NodeJS projects
After failing to find a complete and correct guide on how to set up RaspberryPi4 for NodeJS development right, I have decided to make my own instruction.
- RaspberryPI4,
- MicroSD card that RaspberryPI will use as a hard drive,
- Power source (preferably with a case). USB-C charges for Apple Mac might not work out.
- A password for your WiFi
We are going to setup the device in a headless mode, so there is actually no need to run in circles trying to get a monitor with a keyboard, like the official documentation suggests.
The OS for RaspberryPI is Raspbian - a system based on Debian. I have chosen the light version, since I don't really need the device to run any GUI.
We need a flasher to put the Image to the card. Etcher worked for me just great: it is free and works like a charm. You can use any other software of your choice.
By default, SSH is turned off. We need to re-enable it by creating an empty file called ssh in the root of the SD Card partition.
cd /Volumes/boot;touch ssh;
To enable WiFi we create a file called wpa_supplicant.conf right next to the previous file with the following content (please replace the <PLACEHOLDERS> with actual data):
ctrl_interface=DIR=/var/run/wpa_supplicant GROUP=netdevupdate_config=1country=<TWO_LETTER_ISO_COUNTRY_CODE>network={ssid="<WIFI_NETWORK_NAME>"psk="<WIFI_PASSWORD>"key_mgmt=WPA-PSK}
Plug the SD Card into the device, then connect the device to the power source and turn it on. Give it some time to boot. We need to identify an IP address that your router gave to the device in your wireless network.
First, let's find out your machine IP address. There are many ways to do that. One way is to use tracerouting, while the other is to inspect interfaces with ifconfig:
ifconfig;
The output will be something like this:
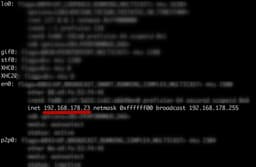
In the list of interfaces the one with WiFi is usually easy to find since it will be probably the only one with IPv4 address defined (besides the Loopback interface).
Then we take this IP and use nmap tool to scan the WiFi network (don't forget to put your own IP address instead).
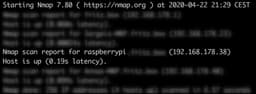
nmap -sn 192.168.178.23/24
The output will be something like this:
If you don't have nmap, you can easily get that installed via brew (you do have brew on your Mac, don't you?):
brew install nmap;
Connect to the device via SSH (don't forget to replace the IP address with your own).
The default password is "raspberry":
ssh pi@192.168.178.38
If everything worked out and you were able to log in, then we are a go!
All right, all annoying stuff is already behind, now the cool part comes next!
We want to make the thing a little bit more secure, so logging with a password every time is not an option. So. On your Mac generate an SSH key pair (if you still don't have one):
ssh-keygen -t rsa -b 4096;
Then send the public key to RaspberryPI:
scp ~/.ssh/id_rsa.pub pi@192.168.178.38:~;
On RaspberryPI create an .ssh folder and put the key we just copied into the list of authorized keys:
cd ~;mkdir .ssh;cat ~/id_rsa.pub >> ~/.ssh/authorized_keys;rm ~/id_rsa.pub;
To disable login via password and prevent root log-in open this file for writing:
sudo vi /etc/ssh/sshd_config;
and change the following lines like so:
PermitRootLogin noPasswordAuthentication no
Also prolong SSH session timeout, since you'll need it when running pretty time consuming tasks via SSH:
ClientAliveInterval 3600
Then restart the sshd:
sudo service sshd restart;
Boom! You are now able to log-in without a password.
Make a system-scale upgrade first:
sudo apt-get update;sudo apt-get dist-upgrade;
Then install NodeJS using NVM:
curl -o- https://raw.githubusercontent.com/creationix/nvm/v0.35.3/install.sh | bash;source ~/.bashrc;nvm install 13;nvm use 13;nvm alias default 13;node -v;
My favourite package manager is still yarn, so:
curl -sS https://dl.yarnpkg.com/debian/pubkey.gpg | sudo apt-key add -;echo "deb https://dl.yarnpkg.com/debian/ stable main" | sudo tee /etc/apt/sources.list.d/yarn.list;sudo apt update;sudo apt install --no-install-recommends yarn;yarn -v;
You may want to dockerise the applications you run on your PI. So, we need Docker. Since PI's processor is ARM, the official ways of installing Docker will not work. Let's do this otherwise.
curl -fsSL https://get.docker.com -o get-docker.sh;sudo sh get-docker.sh;rm get-docker.sh;sudo usermod -aG docker `whoami`;docker version;
For local development there is no life without Docker-compose, so let's install that one as well.
sudo apt-get install -y libffi-dev libssl-dev python3 python3-pip;sudo apt-get remove python-configparser;sudo pip3 install docker-compose;docker-compose -v;
Well, hope that everything worked great for you, and... happy gadget building!
