How I automated day to day GitHub routine with GitHub Toolbelt
Time is not money. Time is a more precious thing. I really like automating the day-to-day routine, so after getting tired of constant misclicks and repeated keyboard work, decided to build a tool that saves a couple of minutes.
In most of my projects I have the following pipeline:
- each feature is developed in a feature branch named like
[feat|fix|...]/ticket-text-ticket-id, - the ongoing release consists of many features squashed into
dev, - the deployment happens when
devgets merged intomaster.
If you have the same workflow as mine, let me show how the GitHub Toolbelt helped me out to automate the thing.

The tool is written in node, so you have to have node runtime installed. Also I still prefer yarn over npm. If you are a JS developer, you already should have all of this on-board anyway.
So, to install the package:
yarn global add @gannochenko/gbelt
or, to install just for the current user:
mkdir ~/.nodeyarn global add @gannochenko/gbelt --prefix ~/.nodeprintf "\nexport PATH=\$PATH:\$HOME/.node/bin\n" >> ~/.bash_profile # .bashrc for *nixsource ~/.bash_profile # .bashrc for *nix
After doing so, a CLI command gbelt should become available:
gbelt -h
To call GitHub endpoints, I need to issue a token first, with the following scope:

Then I put the token to the GBELT_GITHUB_TOKEN env variable:
printf "\nexport GBELT_GITHUB_TOKEN=TOKEN_VALUE\n" >> ~/.bash_profilesource ~/.bash_profile # bashrc for *nix
Lets assume I am in the dev branch now, and about to begin developing a new contribution. I need a branch for that, so I type
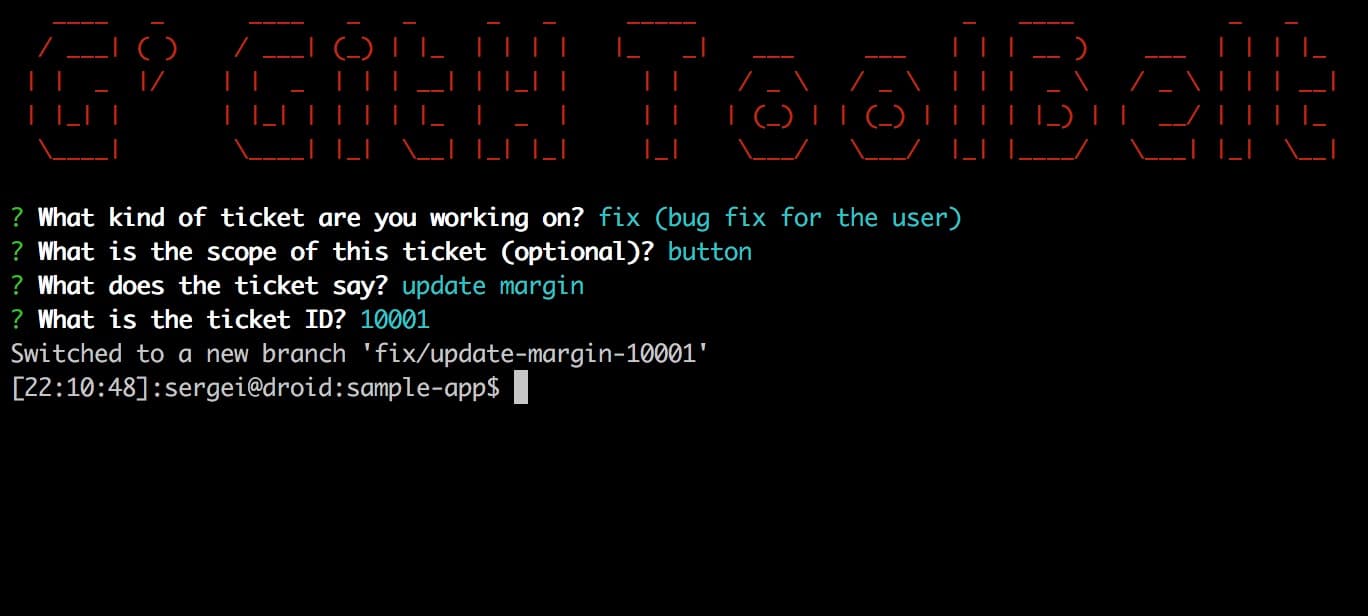
gbelt feature branch
The app will ask me then what kind of contribution is that: feature, fix or something else. The next question will be to describe the update, and provide a ticket number.

The exact answers get stored in the description of the branch as serialized JSON. The command
git config "branch.fix/update-margin-10001.description"
will give me
{"type":"fix","scope":"button","title":"update margin","id":"10001"}
Now that I made some changes in the project, I can now create a PR from fix/update-margin-10001 to the dev.
I commit and push first, like always:
git commit -am "great job"git push origin fix/update-margin-10001
Then to create a PR, I just type
gbelt feature submit
Hopefully, if everything is arright, I am able to see this message:

Mega tip 👉 if somewhere in the root of the project there is a file called .github/PULL_REQUEST_TEMPLATE.md, its content will be used for the PR description, just like Github itself does that. The placeholder #TICKET_ID# will be replaced meanwhile:
## Description* this feature was added## Tickethttps://your-bugtracker.com/ticket/#TICKET_ID#/
So instead of going at Github and pressing buttons there, gbelt allows to squash-and-merge the PR from the command line. I just type
gbelt feature merge

And here we go (yeh, the PR number is different, cos I kind of screwed up the previous two attempts while creating this post):

It is almost like with features, but just a different command:
gbelt release create

So the last part is tricky. Since the release PR is able to trigger the Continuous Delivery pipeline, it can potentially do harmful things.
gbelt release merge
Therefore, the confirmation for this action is required from my side:

Here goes the PR. Note that the PR was merged, not squashed, so I allow CD to work our properly with all that stuff with tags and changelog.

And that is it! Since this release is out, I can now go to step 1 and create new features, and then do everything all over again.
Of course there is a possibility to config the tool :) Just create a file .gbeltrc in your project root folder, with the following content:
module.exports = {developmentBranch: 'dev', // the main dev branch where all the features goreleaseBranch: 'master', // the branch you run deployments fromticketIdPrefix: 'GT-', // if you work somewhere like Jira and you need you tickets to be auto-prefixeduseDraftPR: false, // create a draft feature PR when possiblereleasePRName: 'New release', // the default name for the release PR};
Of course, all of this can be done manually via GitHub web interface. In time the routine actions turn into a habit and basically work on a subconscious level.
And yet we are human, no matter how careful we are, there is always a chance of making a mistake. Being part of a team, you most certainly don't want to mess up with the development pipeline, as well as with the production deployment. So, if there is a way to automate your actions, to have some tool that can give a rap over the knuckles when needed, it could come handy indeed.
Sure thing the tool is not perfect. I still need to have a way to ensure all the checks are green and the PR is ready to merge before actually merge it. This is something I am gonna improve soon.
- Gorgeous GitHub REST API which made this all possible
UPD:
There is also an official GitHub CLI tool now, that solves a more generic task of providing CLI interface to GitHub.
Thanks for reading! Don't mess up with your dev process ;)