
Demystifying running a language model locally
Today everyone is suddenly trying to master the AI. Me isn't an exception. Even though I had some academic knowledge in the field, I was never motivated or curious enough to dive into it before it has become mainstream. Well, better late than never, and today I'm going to expore the topic of running language models (and basically any model) locally.
Let's go.
Nowadays there are many vendors that provide LLM inference as a service: OpenAI, Google, Anthropic, etc. So it's only natural to ask the big question: "Why would I want to run a model locally?" Before diving into the technicalities, let's first discuss the reasons why it may be beneficial.

Any time you use a cloud-based service, you have to trust the vendor to handle your data correctly, and the large language models SAAS are no exception. Furthermore, it would be stupid from their side not to log anything users type in, primarily for the following reasons:
- To improve model accuracy over time, to fine-tune them
- To keep track of user needs (IMO time when LLM providers start selling ads is not far away)
- To detect and block harmful content
With all that being said, users should be aware of anything they type in is stored for further use by the vendor. This reveals a set of problems for organizations that are not willing to share their data. Primarily, such organizations belong to the following categories:
- Banking sector
- Insurance companies
- Health care and hospitals
- Government/military structures
The only chance for such organizations to avoid this is to build their own LLM infrastructure.
The price is typically quoted per million tokens, and for personal use doesn't feel like a big deal. As of May 2025, the price of 1M tokens input/output is:
- GPT-4.1: $2/$8
- Claude 3.7 Sonnet: $3/$15
- Gemini 2.0 Flash: $0.10/$0.40
However, for large organizations, the expenses may add up quickly. Even for simple use cases, like a website chatbot, the expenses may soon go as high as $1000/month and above.
Costs is something that should be carefully considered, especially for startups.
When it comes to LLMs, censorship is a tricky topic. Certainly, common sense, people's dignity and legal regulations should prevail, but sometimes it's desired to have certain freedom. Most of vendors apply restrictions on what a model can accept and produce: be it memes with celebrities or offensive language. Some models are forbidden to speculate about politics, for example, DeepSeek.
To avoid unwanted restrictions, it's possible to run debiased models locally.
What if you want a model that can speak in a certain way? Or, a model that can provide information about a certain topic? There are things such as RAG, agentic models and so on, but there is one thing that not every provider offers: model fine-tuning.
Fine tuning is a process of training a model on a specific dataset. It's a powerful tool that allows you to customize a model to your needs.
There are certain reasons why you may consider refraining from running a model locally:
- You don't have a powerful hardware/fast internet connection on premises
- You can't find a good open source model that matches your needs
The first problem is solvable by renting GPU power on a cloud provider, but then you have to deal with the problem of privacy and costs. The second problem is more complex and requires engineering efforts.
This time I am going to go with a model that runs on a local machine, as if a company has its own data center and wants to run LLMs for its own use.
To find a model that suits your needs, Hugging Face is a great place to start, as it has a lot of models and a good documentation. It's basically a catalog of models you can run on premises.
Just go to the Models section and search for a model that matches your needs by browsing through the categories, licenses, etc. Good examples are DeepSeek-R1, Llama-3.1-8B or Gemma-2-9B.
A prominent example is also Perplexity R1 model, which is a fine-tuned version of DeepSeek R1 with censorship removed.
When choosing a model there are a few things to consider:
- The amount of parameters, i.e. the size of the model. The model can have 2B, 70B, 175B parameters and more. Typically, the more the merrier, but keep in mind, that in order to run, a model needs to fit into memory completely. Models with lesser parameters are typically faster, but they tend to hallucinate more. The corellation between the amount of parameters and the memory the model needs is the following:
- 1.5B => ~1GB
- 7B => ~4.5GB
- 14B => ~9GB
- 32B => ~20GB
- 650B => ~400GB
- Context window, i.e. the maximum number of tokens that the model can handle in a single request. The larger the context window, the more information the model can use to generate a response.
- Model specialty, i.e. the type of the model. There are models that are specialized in certain tasks, like translation, summarization, etc.
A model is just a bunch of numbers, it's pretty useless by itself. It needs to have an inference engine it can run on.
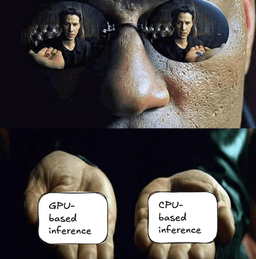
Now that we know how to choose a model, let's discuss how the model is going to be run. Take a look at the hardware at your disposal. There are two options to choose from: CPU-based inference and GPU-based inference (technically speaking, there are also TPUs by Google, but they are not available for retail).
Currently there are numerous inference engines, each engine specializes on CPU, GPU inference, or both. Here are some of the most popular ones:
| Inference Engine | Vendor / Maintainer | CPU/GPU Support |
| ONNX Runtime | Microsoft | CPU and GPU |
| llama.cpp | Community (Georgi Gerganov) | Primarily CPU, some GPU |
| vLLM | UC Berkeley / Community | Primarily GPU |
| DeepSpeed | Microsoft | GPU (NVIDIA, AMD) |
| Hugging Face Transformers | Hugging Face | CPU and GPU |
| TensorRT-LLM | NVIDIA | GPU (NVIDIA) |
| TensorFlow Lite | CPU and GPU (Mobile/Edge) | |
| OpenVINO | Intel | CPU and Integrated GPU |
| TVM | Apache Software Foundation | CPU and GPU (Customizable) |
What about projects like Ollama or LM Studio? Well, they are not only inference engines, but rather fullstack LLM frameworks that include a model runner, model downloader, model converter, etc. While they are great, for this project they are not relevant, as we only need an inference engine.
🚨 It's important to understand, that CPU-based inference is typically less performant, due to the following reasons:
- CPU is not optimized for tensor operations (matrix and vector multiplications), but GPUs are better in this (in a way).
- CPU-based architecture cannot be effectively scaled horizontally, but with GPUs you can have arrays of compute units (say "Hi!" to NVIDIA).
In a nutshell, a model running in the cloud is none other than a microservice, that has the following functionality:
- Exposes API for model inference. It must support certain formats and allow streaming of the response.
- Has a way to serve requests in parallel.
- Has rate limiting enabled.
- Can efficiently scale horizontally.
- Has observability enabled, i.e. it can be monitored and managed.
- Has a way to update the model with zero downtime.
Let's build one! Ofcourse, it won't have all the features, but it will be a good starting point.
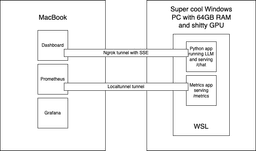
At my disposal I have a PC machine with AMD Ryzen 7 5800X 8-core CPU, 64GB RAM and NVIDIA GeForce RTX 3060 Ti 8GB GPU. I need to keep in mind, that besides loading the model itself, I need to reserve some memory for running the inference, the microservice and other processes. I also have a macbook I would prefer to run my frontend on.
With all that being said, my best choice is to go with a CPU-based inference and a model with no more than 70B parameters.
The inference engine I chose was llama.cpp as it supports CPU inference. To make things easier and quicker, I chose Zephyr 7B model converted to GGUF format, originally derived from Mistral-7B-v0.1. The model weights about 5-8Gb.
In theory I could have taken the original Zephyr-7B-beta model and converted it to GGUF format myself, as llama.cpp supports conversion from Hugging Face.
Another good option would be to use Zephyr with original Hugging Face Transformers, as they natively support CPU inference as well.
On my PC machine I had Windows 12 installed, and honestly I had no plans to install Linux as a second system, as I would have to do 10 years ago. Today it's not even needed, as now Windows has WSL 2 that allows running a Linux kernel next to it.
So the plan was the following:
- Download the model, create a simple microservice in Python that exposes the /chat endpoint, and run it on my PC inside WSL.
- Create a small frontend app in React and run it on my Macbook.
- Optionally create the metrics service, that will expose information about CPU and memory utilization, and connect it to Prometheus and Grafana.
- Create a tunnel using Ngrok or Localtunnel to expose the service to the internet.
Let's get to work!
First, we needed to install WSL 2, if not already installed, and then install Ubuntu 22.04 LTS on it.
wsl --installwsl --install -d Ubuntu-22.04wsl --set-default Ubuntu-22.04
Inside WSL 2 we can do pretty much anything a real Ubuntu allows, and it will share the same memory and hardware with the host. It's important to note, that WSL is not a sandbox, so it's not safe to run potentially harmful code in there, as it can affect the host machine.
At this point we will need to have Python and Hugging Face CLI installed.
On Windows, we should install and configure Ngrok.
Create a project directory inside WSL 2 and pull the model:
mkdir llm-localcd llm-local
We can go to the Files and Versions section of the model and pick the best one: Q8_0.
Then start downloading the model, sit back, relax and enjoy the flight, as it may take a while (took me about an hour):
huggingface-cli download TheBloke/zephyr-7B-beta-GGUF zephyr-7b-beta.Q8_0.gguf --local-dir .
We setup the environment and install the dependencies needed:
python -m venv .venvsource .venv/bin/activatepip install llama-cpp-python fastapi pydantic psutil uvicornpip freeze > requirements.txt
As I am no expert in Python (yet), I quickly vibecoded a simple service that exposes the /chat endpoint and streams the response back:
from llama_cpp import Llamafrom fastapi import FastAPIfrom pydantic import BaseModelfrom typing import List, Dict, AsyncGeneratorfrom fastapi.responses import StreamingResponse, PlainTextResponseimport asynciofrom fastapi.middleware.cors import CORSMiddlewareimport psutilimport timeimport re# GLOBAL VARIABLESzephyr_model_path = "./zephyr-7b-beta.Q8_0.gguf"START_TIME = time.time()app = FastAPI()app.add_middleware(CORSMiddleware,allow_origins=["*"],allow_credentials=True,allow_methods=["*"],allow_headers=["*"],)zephyr_llm = Llama(model_path=zephyr_model_path,n_ctx=4096,n_threads=8,)class ChatRequest(BaseModel):messages: List[Dict[str, str]]stream: bool = Falsemax_tokens: int = 2048def convert_to_chatml(messages: List[Dict[str, str]]) -> str:"""Convert messages from the OpenAI/Llama-2 format to ChatML format for Zephyr 7B."""chatml_prompt = ""for message in messages:role = message["role"]content = message["content"]if role == "system":chatml_prompt += f"<|system|>\n{content}\n</s>\n"elif role == "user":chatml_prompt += f"<|user|>\n{content}\n</s>\n"elif role == "assistant":chatml_prompt += f"<|assistant|>\n{content}\n</s>\n"# Add the assistant tag at the end to prompt the model to generateif not chatml_prompt.endswith("<|assistant|>\n"):chatml_prompt += "<|assistant|>\n"return chatml_prompt@app.post("/chat")async def chat(request: ChatRequest):chatml_prompt = convert_to_chatml(request.messages)response = zephyr_llm.create_completion(prompt=chatml_prompt,max_tokens=request.max_tokens,stream=True,stop=["</s>", "<|user|>"] # Stop generation at these tokens)return StreamingResponse(stream_chatml_generator(response), media_type="text/event-stream")async def stream_chatml_generator(response):for chunk in response:if "choices" in chunk and len(chunk["choices"]) > 0:choice = chunk["choices"][0]if "text" in choice:content = choice["text"]if content:# Clean the chunk content before sendingif content:yield f"data: {content}\n\n"yield "data: [DONE]\n\n"@app.get("/")async def root():return {"message": "Zephyr API is running"}
What's important here:
- The model is loaded once at startup and then reused for multiple requests.
- The response is streamed back to the client. The MIME type
text/event-streamindicates, that the Server-Sent Events protocol is used. - We won't store the conversation history on the server side, the client provides it upon each request. Normally this isn't good for production, but for this small PoC it's okay. The model will load the entire conversation into the context window and provide a completion after the prompt.
- The endpoint accepts data in the OpenAI/Llama-2 format (an array of objects with
roleandcontent) and converts it into the ChatML format before sending to the model, as Zephyr 7B expects, as clearly stated in the readme. If not done so, the model will not understand the input and will get confused between the user and assistant roles.
The time was almost up, so I vibecoded a simple frontend in React, that uses the /chat endpoint to get the response from the model.
The most interesting part of the application is the useAIStream hook in the chat.ts file:
import { useState, useCallback } from 'react';import { useMutation } from '@tanstack/react-query';// Define types for messages and API responsestype Role = 'system' | 'user' | 'assistant';interface Message {role: Role;content: string;}interface AIStreamParams {messages: Message[];}export function useAIStream() {const [streamedContent, setStreamedContent] = useState<string>('');const [isComplete, setIsComplete] = useState<boolean>(false);// Reset the streamed contentconst resetStream = useCallback(() => {setStreamedContent('');setIsComplete(false);}, []);// React Query mutation for handling the streaming requestconst mutation = useMutation({mutationFn: async ({ messages }: AIStreamParams) => {try {// Reset the stream content when starting a new requestresetStream();// Prepare the request bodyconst body = JSON.stringify({messages,stream: true,});// Make the fetch requestconst response = await fetch(`${process.env.REACT_APP_TUNNEL}chat`, {method: 'POST',headers: {'Content-Type': 'application/json',Accept: 'text/event-stream',},body,});if (!response.ok) {throw new Error(`HTTP error! status: ${response.status}`);}// Get the response body as a readable streamconst reader = response.body?.getReader();if (!reader) {throw new Error('Failed to get stream reader');}// Process the streamconst decoder = new TextDecoder();let buffer = '';while (true) {const { done, value } = await reader.read();if (done) {setIsComplete(true);break;}// Decode the chunk and add it to the bufferbuffer += decoder.decode(value, { stream: true });// Process the buffer for SSE eventsconst lines = buffer.split('\n');buffer = lines.pop() || ''; // Keep the last incomplete line in bufferfor (const line of lines) {if (line.startsWith('data: ')) {try {const data = line.slice(6); // Remove 'data: ' prefixif (data === '[DONE]') {setIsComplete(true);continue;}setStreamedContent((prev) => prev + data);} catch (e) {console.error('Error parsing SSE data:', e);}}}}return streamedContent;} catch (error) {console.error('Streaming error:', error);throw error;}},});// Return the hook APIreturn {streamContent: streamedContent,isStreaming: mutation.isPending,isComplete,error: mutation.error,startStream: mutation.mutate,resetStream,};}
...and the ChatComponent.tsx component:
'use client';import React, { useState } from 'react';import Input from '@mui/joy/Input';import Button from '@mui/joy/Button';import { useAIStream } from '../../hooks/chat';type Message = {role: 'system' | 'user' | 'assistant';content: string;};const ChatComponent = () => {const [messages, setMessages] = useState<Message[]>([{ role: 'system', content: 'You are a friendly chat bot' },]);const [input, setInput] = useState('');const { streamContent, isStreaming, isComplete, startStream, resetStream } =useAIStream();// Handle sending a new messageconst handleSendMessage = () => {if (!input.trim() || isStreaming) return;// Add user message to the messages arrayconst updatedMessages = [...messages,{ role: 'user', content: input },] as Message[];console.log('MESSAGES:');console.log(updatedMessages);setMessages(updatedMessages);// Clear input fieldsetInput('');// Start streaming the AI responsestartStream({ messages: updatedMessages });};// When streaming is complete, add the assistant's message to the chat historyReact.useEffect(() => {if (isComplete && streamContent) {setMessages((prev) => [...prev,{ role: 'assistant', content: streamContent },]);resetStream();}}, [isComplete, streamContent, resetStream]);return (<div className="chat-container"><div className="messages-container">{messages.slice(1).map((message, index) => (<divkey={index}className={`message ${message.role}`}style={{ marginTop: '1rem' }}><strong>{message.role}:</strong> {message.content}</div>))}{/* Display the streaming content */}{isStreaming && (<divclassName="message assistant streaming"style={{ marginTop: '1rem' }}><strong>assistant:</strong> {streamContent}</div>)}</div><divclassName="input-container"style={{display: 'flex',justifyContent: 'space-between',marginTop: '1rem',}}><Inputtype="text"value={input}onChange={(e) => setInput(e.target.value)}onKeyDown={(e) => {if (e.key === 'Enter' && !isStreaming && input.trim()) {e.preventDefault();// Assuming you have a function like handleSendMessage() to send the messagehandleSendMessage();}}}placeholder="Type your message..."disabled={isStreaming}style={{ flexGrow: 1, marginRight: 10 }}/><ButtononClick={handleSendMessage}disabled={isStreaming || !input.trim()}>{isStreaming ? 'Thinking...' : 'Send'}</Button></div></div>);};export default ChatComponent;
Kudos to Claude for the frontend code.
BTW, if the dashboard seems ugly, there are good alternatives to it, such as OpenWebUI.
Inside the WSL 2, start the backend:
uvicorn backend:app --host 0.0.0.0 --port 8000
On Windows, start the Ngrok tunnel:
ngrok http http://localhost:8080
On Macbook paste the ngrok URL into the REACT_APP_TUNNEL environment variable and start the front-end:
npm start
As the frontend is running, try sending a message to the model: "Hey, are you there?" 👽🛸
Now that we understand the basics of running models locally, we can apply this knowledge to running other models on different other platforms. For instance, it would be particuarly interesting to try running lightweight models on Raspberry Pi.
Another vector of exploration would be to dive into the world of agentic AI (e.g. using LangGraph) and MCP, but this is a topic for another post.
One way or another, I definitely need to purchase a decent GPU :)
The code for this projectis available on GitHub. Have fun!
