
Building my first n8n workflow: Lessons from the Trenches
Back in the days I was seeing a lot of blog posts and videos about n8n. Around that time, I was being interviewed for a position at n8n, and in order to get an advantage, I thought it would be a good idea to try the product. I was also in need of some automation for my blog. All that combined influenced my decision to give n8n a try.
The goal was actually pretty simple:
- Create a new S3 bucket if it doesn't exist
- Read a folder on my local machine with a bunch of images
- For each image:
- Change the size to some reasonable value
- Optionally blur car signs, if any
- Generate an LQIP (Low Quality Image Placeholder) image
- Upload everything to an S3 bucket
- Update an MDX file of an article, listing all the images
I could have get it vibecoded as a NodeJS script (an I've even started doing that earlier), but for the sake of learning n8n, I've moved on with the workflow instead.
I also had an option to vibecode the workflow itself, but that would have taught me nothing.
I belived in myself, so I took an ill advised decision to not read the documentation and learn everything by doing. Well, it was the first mistake I made, because I've spend around 2 weeks to get it nailed. I highly recommend going through this and this tutorials, it will save you hours.
As a trigger node I initially tried to use the "On form submission" node, but it was very awkward: upon every workflow execution a modal window would pop up, where I had to fill in the form parameters. I tried emulating the form submission via Postman, but the fields were expected to be named strangely (field-0, field-1, etc.).
Eventually I've settled for the "Webhook" node, which was much easier to use with Postman. I think this was a standard recommended practice.
The next question I had was: where to keep the global workflow settings.
At first I tried using $vars, but it was not working, and I've spent a while
discussing it with Claude. Only later I've discovered that $vars was only available in the paid version of n8n.
Eventually I've moved on with the "Set parameters" node, and referenced it everywhere downstream via $('SetParameters').first().json.<PARAMETER_NAME>.
Another awkward discovery was the fact, that I couldn't set codes for my nodes, so in order
to reference them, I had to use the node name, e.g. {{ $('Upload files to S3').first().json.foo }}. This wasn't a big deal, since after getting a node renamed,
n8n would automatically update the references everywhere, but still it was a bit of an eyesore.
Initially I've tried the AWS S3 nodes, as I expected it would work on every S3-compatible storage. If only! I hosted everything on DigitalOcean Spaces, and the nodes were pushing for IAM credentials, which obviously wouldn't work. Only later I've discovered there was a separate generic S3 node, which worked.
When uploading files to S3, choose the "Binary data" option, the file content will arrive as a base64-encoded string.
Many nodes support two modes in their parameters: "Fixed" or "Expression". If the expression mode is selected, you can use the {{ }} syntax to reference other nodes' outputs and doing other stuff.
The code node turned to be extremely limited. It is basically a very sandboxed JavaScript environment, which doesn't allow reading/writing to the file system, executing shell commands or making HTTP calls (for all that there are separate nodes). The only useful application I found for it was acting as a transformer, filtering or reshaping the output of an upstream node into something else, that a downstream node could understand.
This was actually quite tricky. A nod receives input through the $input variable. The output must be an object with a json property, which contains the data to be passed to the next node.
Since n8n doesn't have the while "node" (as such), it handles multiple items in the input internally.
A node can operate in two modes: "Execute once" and "Execute for each item" (by default), and depending on which mode is selected, the behaviour changes a little.
If the node is in "Execute for each item" mode, it will receive the input via $input.item variable, and it must return an object with the json property (as stated above).
However, if the node is in "Execute once" mode, it will receive the input via $input.all()/$input.first()/$input.last() variable, and it must return an array of objects, each object with the json property.
For me as an engineer this concept was difficult to grasp at first, because I was thinking imperatively. But when the workflow is being executed in the UI mode, n8n will draw numbers that represent the size of input/ouput of each node, and I my task was to make sure the numbers won't multiply in a funny way.
N8n has dedicated nodes for reading and writing to the file system, and bad news is: it reads an entire file into memory. When an input contains 10 file names (regardless of wheter the "Execute once" mode is enabled or not), it will read 10 files 🫠 And when the input has 100 files, the backend crashes with OOM.
Yessss, apparently the concept of streaming was not a thing (or at least I couldn't find this feature).
That is why I had to use...
Turns out there was the loop operator after all, it just works differently.
So what it does is: it breaks the input into chunks, and executes the downstream pipeline for every chunk.
When the chunk size is 1, it behaves like a while-ish loop. It has one input, and two outputs: done and loop. The pipeline from the loop output should eventually return to the input.
This is a bit confusing, because it deviates from the usual pattern.
So by using the loop node, I was able to avoid OOMs. One should only use the loop node when it is absolutely necessary, because otherwise n8n handles the multiple items internally.
You can have several lines going out of a node, and that's how you create pipelines that execute in parallel.
I was struggling with understanding how to wait for all of them to complete. I tried using the "Wait" node, didn't work.
I tried putting several outputs into one input of a downstream node, didn't work either: this
layout creates a undeterministic behaviour, because n8n will immediately resume upon
receiving output from any of the branches (sort of like Promise.any()). This will eventually lead to a race condition, this is not what you want.
After many hours of trial and error, I've decided to proceed with the "Merge" node. Maybe it wasn't very idiomatic, but it did the trick. The merge node essentially waits for all the branches to complete, and then "combine" the outputs into one array, or will just forward the output of a selected branch (depending on the settings).
There is only so much you can do using standard nodes. Sooner or later you will need to extend the workflow in certain ways.
There are the following ways to customize the workflow:
- Using the Code node (very limited)
- Creating a custom node (may be an overkill)
- Deploying n8n as a custom Docker image where additional tools are installed (can be difficult to scale)
- Build and deploy a custom microservice/CLI tool that can be called either via the HTTP node or via the Execute Command node.
In my case, I had to do both:
- search for images in a folder using find
- normalize EXIF data using exiftran
- generate LQIP using Primitive
- extract EXIF / resize image / blur car signs using HTTP calls to a custom microservice running on the same host machine:
http://host.docker.internal:8000/v1/image/blurhttp://host.docker.internal:8000/v1/image/resizehttp://host.docker.internal:8000/v1/image/exif
Note: for the endpoints that require file content, I've enabled the "Send body" option, Body Content Type was set to "Form-Data", and then
the body parameter was set to n8n Binary File. In this case the file will arrive as a base64-encoded string in the form field with a given name.
I think those were all the quirks I've encountered.
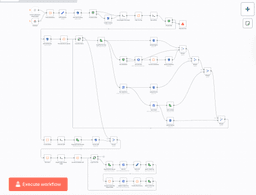
The workflow contains the following parts:
- Making sure the S3 bucket exists
- Reading the list of images from a folder
- Getting the list of images from the S3 bucket
- Making a diff, if the diff is non-empty, we proceed
- For every file:
- Upload the original
- Detect car signs, upload detections
- Resize, blur car signs and upload
- Generate LQIP and upload
- Update the MDX content file
Here is the resulting workflow:
Now that I have some experience with n8n, I can share my thoughts, observations and opinions. This is by any means not a verdict or win/loose contest.
- n8n works great for non-technical people, who has little experience with programming.
- It is a great tool for business processes automation, be it a one-person company or an enterprise.
- If you are a skilled engineer with a lot of hands-on experience, it's easier to vibecode the thing, wrap it with docker and deploy.
- If processes are not changing very often, n8n may not be the right choice.
- Highload and high throughput may be problematic with n8n.
- n8n cloud is a massive advantage, as you don't have to worry about the infrastructure and deployment.
- Self-hosted n8n devalues the cloud advantage a bit, but still, once deployed, you can have as many workflows as you want.
- Scalability may become additional hassle for self-hosted n8n.
- All nodes are already tested and 99% working, so you can save time on testing and debugging.
- For scripts running locally, or one-time scripts it's easier to vibecode a CLI script.
- To create something more complex than just glue logic, you will have to create your own microservices/dashboards anyway.
That's all for now. While n8n is a great tool, I will probably replace my workflow with a nodejs microservice and some react dashboard (or with a desktop app even) in the future, because I need additional UI to make sure the detections were correct.
